Friday, 3 May 2013

Winter's not coming...summer is!

Its been a while since my last blog post, but there's been lots going on. Since March i've been skiing on BUSC with people from uni;


I've been very ill due to the alcohol consumption on that holiday;


aaand i've booked a trip to Paris in August!


 Busy busy busy..

Also as you may or may not have gathered from the title of this blog post i am kind of going mad for Game of Thrones at the moment. I'm new to it just this past couple of weeks but i've already made it through the entire first 2 seasons and caught up on the 3rd as well! Somehow in between that 25hours+ of tv watching i've managed to complete my final coursework for 2nd year of uni #TimeToPartaay...almost; just got 2 more exams to do and thats my year finished, so its revision revision revision at the moment, head in the books.

So now we're all caught up on my ever so interesting life, down to business. I have naturally been working on some new nail patterns, and this particular one i've been trying to get right for absolutely ages. Now that i've worked it out i really can't understand how I didn't manage it sooner, who knows what i was doing wrong. Its a water marble effect; so far i've only mastered using 1 or 2 colours just to keep it simple. Anyway, here are some pictures of the finished product...


I much prefer using white as the base colour, just helps the colours show up better, but i'm away to try a pink base coat and then yellow or orange on top...see how it all turns out!

So all you're going to need to do this is a glass of water (just average temperature), the nail polish that you've chosen for your design, a needle/cocktail stick, masking tape or Sellotape and cotton buds:
  • Step 1: Take the nail polish that you have decided to be your base coat and paint all of your nails. Give it a second coat just to make sure you have a nice even covering.
  • Step 2: Once your nails are dry, take the tape and cover your fingers around the nail so that the extra nail polish doesn't get stuck to your fingers and make a mess everywhere.
  • Step 3: Then take your glass of water and your nail polishes that you're using for the design. Put a drop of the first colour into the water in the glass. This should disperse into a ring of thin polish. (I find that some nail polishes are better than others, if they are too thick and gloopy it won't work; BarryM has worked best for me) Take you're next colour and put a drop in the ring of paint you've already created and continue alternating colours until you have about 5/6 rings of nail polish.  If you want to be able to see the base coat that you painted on your nails pink one colour eg. blue and use clear nail polish as you're alternating colour. 
  • Step 4: Once you've got your rings of nail polish, take you're needle, pin, cocktail stick or whatever you've chosen and working from the outside in drag it through the rings of paint to create a swirl design. Because the outer rings will have dried faster in order for the design to work start you're pattern from the 2nd ring in from the outside.
  • Step 5: When you've created a pattern that you like dip you're nail into the water at the particular spot you like the best. Hold it in the water for about 20 seconds while the nail polish on the surface dries.
  • Step 6: Next get a cotton bud and scrape away all the excess nail polish in the water and lift you're finger out.
  • Step 7: Because you wrapped your finger in tape when you peel it off hopefully the main proportion of the nail polish will be on you're nail and not your hands. 
  • Step 8: Finally take a cotton bud with some nail polish remover on it and wipe away any excess nail polish that's gotten on your fingers just to clean up the design.

Hopefully this all works out for you, it might take a bit of practise to get a good pattern but stick in there and it will all work out :)

Thanks for reading
Maddie!


Friday, 5 April 2013

Magazine Nail Transfers

Helloo..

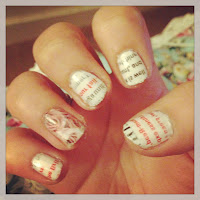
Just going to start with something that i did recently.. this evening in fact. I'm a big fan of doing my nails.. It used to be the simple one-colour-one-coat affair in primary school where the nail polish coated more of my hands that the actual nail, but i have upped my game since then, and have now graduated to all kind of crazy stuff! So it's something that i saw someone post on instagram (you'll find that i love instagram a lot), and basically it involved transferring small images or pieces of text from magazines on to your nails. Sounded complicated to me at first, but it's really the simplest thing.


This is the end result ^^
It was my first attempt at it so excuse the shoddy work, pracise makes perfect i guess, and this will not be the last time i'll be doing this. You just start with a base coat, any colour you fancy, i went with white so that all the images showed up better, but really any colour that takes your fancy is welcomed. Once you've put on the base coat and let it dry, get a cotton-pad and wet it with 'rubbing alcohol'.. -side  tip: vodka works just as well and if you're like me, it's usually in more constant supply. Then simply place the magazine cutting image side down and hold in place while you rub the alcohol on it. When it's damp slowly lift the paper off and voila!
A coat of clear nail polish just locks in the design and keeps it looking better, for longer.

Any magazine can be used and even text can look really cool when it's rubbed on:


The only magazine i had on hand were Marie Claire and Elle, So on the top image i've gone for a bit of Vera Wang's princess crown on the pinky, the Mulberry tree on the middle find and the checkered louis vuitton advert pattern on the 2nd finger. And on this image just here i decided to paste some poor women's life problems for the world to see.. oops!

Anyway its lots of fun and looks great, so i recommend giving this one a try for yourself

:)

Instagram

Tuesday, 19 March 2013

Sponge Fading & Layering

Hey!

I'm not really sure if there's some kind of secret bloggers code about how to lay out a blog...some kind of orderly system i don't know about? ..because this is going to be the biggest jumble of posting you'll probably ever see. I'm a bit of a jumbly person by nature...its a feature about myself that i like to consider endearing, others may disagree!

So over the last couple of months i've kind of been mad for doing my nails. Went online and checked out a few other blogs and videos on youtube and now i've just been working on some nail design ideas.
This is one of my favourites and was really popular amongst some of my friends..so i thought i'd share it with you..


Not surprisingly this is so simply to do and can be done using any colours, which makes it quite easy to personalise to an outfit! You will need: 3 nail polishes (these can be 3 completely different colours, or 3 different shades of a colour), clear nail polish and a sponge (this can simply be a sponge from the kitchen, or a make up sponge completely your choice).

Step 1 - Make sure your nails are completely clean and all previous nail polish has been removed.

Step 2 - Choose a base coat. This is going to be the main colour of the nail. Any colour is fine, just make sure that the other colours that you are using contrast so that they show up when they are added later. When i was doing this particular design i choose a dark purple colour.

Step 3 - Once the base coat has been layered on nice and thick and has been left to dry completely you can move on to the next step. Take the 2nd colour that you've decided on and dab it onto the corner of your sponge. Don't put too much on otherwise you don't get the speckled effect, and you can always add more later. In this case less is more!

Then gently dab the sponge on the nail starting from about midway down the nail working your way up to the tip. You can't really go wrong here, so if you are feeling that it looks a little messy, or you've put it on too thick, take a clean corner of the sponge and dab some of the nail varnish off.

Step 4 - After you have left that coat to dry also, take your third and final colour and do the same by dabbing it on to a new corner of the sponge. This time start from just about a quarter of the way down the nail and more gently and sparingly dab on the polish over the top of the previous colour. Although you don't want to cover up the colour underneath completely, when you are closer to the tip you can thicken up the coverage of the colour you are using to create a nice layering affect.

Step 5 - Leave all this to dry and finish with a top coat of clear to protect your nails.

Enjoy!

Sunday, 17 March 2013

Heya!

Heya everyone!


So thats me ^^ ..well if you ignore the criminal Instagram abuse and makeup (i'm under there somewhere haha).

Basically this is my blog...well my new one. I had another one from last year which we had to do for uni but as it always is, if you're forced to do something you end up hating it! So i've decided to start fresh of my own accord this time and do things a little differently.

A bit about me: I study Fashion Management at university in Aberdeen also known as the Granite City or the more glamourous Silver City simply for the fact that it is made of granite which is grey; a colour i think myself and the rest of Aberdeen's population have come to resent. Despite this minor factor its been the best time of my life i think i'd go as far to say. I'm two years into the course and its all just a bit of fun. There are days where i just want to do a Britney and shave my hair off because it can be so stressful and such hard work, but i really wouldn't swap the amazing girls in my class who are now my bestfriends and all the other wonderful people i've met along the way for anything!

I do love fashion, but what i really love is experimenting with nail art and most of all makeup and beauty. Not saying that i always look fantastic...because trust me, you think you have a bad looking day, i have a bad looking decade haha. So this is just a little way for me to share with you my fave brands, beauty products, new purchases and also all the 'fabulous' pictures of me trying different things out.

So please take a read, take a look and most of all..Enjoy!

:)

If you're interested catch me on Instagram on the link below

Instagram